New year, new music:

MRF PRODUCTIONS - 2018
Tuesday, January 1, 2019

Wednesday, December 19, 2018
Quiescent - Part 1 (of 1?)
This is "Quiescent", a song made using sounds only from the Arturia Matrixbrute... well, except for the drums and 3 short sound effects samples. All sounds from the brute was made by me, and everything was recorded into Reason 10.
No loudness processing was made for the sake of sound quality.
Make music, not loudness war!
Enjoy!
No loudness processing was made for the sake of sound quality.
Make music, not loudness war!
Enjoy!
Tuesday, July 3, 2018
Arturia Matrixbrute - The Cons
While there are lots of positive reviews of the Arturia Matrixbrute I hardly found anyone bringing up it's shortcomings, so here's what I find annoying after owning one for 6 months.
The story:
I had a Moog Subphatty for about a year, a synth I truly loved, but as it was pretty limited in modulation features I sold it and got the Moog Subsequent 37 CV instead. It didn't take very long to realize that the 37 CV didn't have the same 'fatness' like the Subphatty did! I also noticed that the 37 CV had annoyingly high overtones, especially the first one (octave) when listening to simple waveforms. The latter could maybe be tamed with proper gain staging, but the lack of low end fatness was a big downer. I thought it would be a Subphatty on stereoids, but they sounded very different. Also, most of the knobs on the 37 CV were a bit loose and when touching them it sounded like they were fastened with some cheap glue that hadn't dried yet! Needless to say, because of this the Subsequent 37 CV was a huge disappointment and I sent it back to the retailer and got the Matrixbrute instead.
While the Matrixbrute is a BRUTE audio wise, it's far from perfect.
Here's what I think is wrong with it:
 |
| The Arturia Matrixbrute (Cat was not included in the box) |
I had a Moog Subphatty for about a year, a synth I truly loved, but as it was pretty limited in modulation features I sold it and got the Moog Subsequent 37 CV instead. It didn't take very long to realize that the 37 CV didn't have the same 'fatness' like the Subphatty did! I also noticed that the 37 CV had annoyingly high overtones, especially the first one (octave) when listening to simple waveforms. The latter could maybe be tamed with proper gain staging, but the lack of low end fatness was a big downer. I thought it would be a Subphatty on stereoids, but they sounded very different. Also, most of the knobs on the 37 CV were a bit loose and when touching them it sounded like they were fastened with some cheap glue that hadn't dried yet! Needless to say, because of this the Subsequent 37 CV was a huge disappointment and I sent it back to the retailer and got the Matrixbrute instead.
While the Matrixbrute is a BRUTE audio wise, it's far from perfect.
Here's what I think is wrong with it:
- The "VCO1 < Noise > VCF 1" Modulation Knob Bug
- The knob doesn't work as intended! When turned from 12 o'clock to the left, Noise should modulate VCO1, and when turned to the right Noise should modulate VCF 1. Due to a firmware bug, it's only VCF 1 that gets modulated, unless you first turn the knob from the 12 o'clock position a bit to the right into VCF 1 area and then back into VCO 1 area! The really annoying thing about this is that Arturia has known about this bug for more than a year, but neglect to fix it!
- Lack of Envelope Control
- No loopable envelopes. Nope.
- It's not possible to get the envelopes to always restart from '0' when the release is up and the envelope hasn't finished it's complete cycle. Therefore It's not possible to always get a long Attack while also having a long Release when playing notes. Legato button does not change this. I did come up with a workaround using the Matrix and Env3, but I would like to use Env3 for other things. Arturia claims this as "analog behaviour", yeah sure... but on the Moogs there's an optional switch!
- Pitch Wheel Dead Zone
- The Pitch Wheel has to be turned pretty much before making any pitch changes, in both directions. There's a (too) big dead zone in the center!
- The Sequencer
- The correct pitch of any made sequence will always be set to middle C. This 'feature' should at least be optional.
- There is no preset editor
- No other way to see presets, but to dial them in using Preset + Knobs.
- No way to name presets on the synth itself
- Only way to change the name of saved presets is by using a computer.
- MIDI Control Center (Preset management software)
- Feels like an early beta version, and isn't very user friendly.
- If you save a preset on the Matrixbrute, there is no way to do a 'refresh' in the MCC. You have to either close the app, or select another device in the list and then get back to the Matrixbrute. After that the connection refreshes, and the newly saved preset is available for naming. Why isn't there a refresh button? Or why isn't a refresh triggered when saving a preset on the synth?
- Rate knobs for LFO 1 and 2 does not support triplets
- Not possible to make triplet-rhythms, when tempo synced.
- No preview of target preset before overwriting
- Before you tweak a preset that you might wanna save, you'd better know where to save it first, as there is no way to listen to target presets before saving. Hopefully you won't overwrite your favorite preset. Hopefully you also have a backup in MCC.
I don't think a $2000 synth should have these problems. Unfortunately Arturia seems to be all-in with their new machines Drumbrute, Rackbrute and Minibrutes at the moment, and their flagship synth is no longer prioritized. The lack of response to user feedback on their own user forum speaks for itself and as I said above the known bugs are still not fixed.
There's much to read on the forums: https://forum.arturia.com/index.php?board=157.0
Despite the above shortcomings, the synth IS massive and has a very wide range in audio design.
Compared to the Moogs it does have very narrow sweet-spots, so it's a bit tricky to quickly get 'that pleasant analog sound' , but at the same time it's a pure joy to discover new sounds and ways to modulate parameters!
But with that said...
As long they do not fix the pure bugs in the Matrixbrute I won't buy another Arturia product!
If I had known about these shortcomings I would have probably kept my Moog Subsequent 37 CV.
The Matrixbrute is good, but with a little more love from its creators it could be awesome!
If you're in the process of getting a Matrixbrute, I hope you found this post helpful in making the right decision!
Monday, March 20, 2017
Korg Volca Beats Snare Mod
Got hold of a used Korg Volca Beats recently, but soon discovered that the snare wasn't very nice... at all. Did some online searches and I soon found out about the missing capacitor C78!
A quick stop at ELFA to pick up some 100nF Ceramic Capacitors and a bit of soldering did the job, and the snare got much better sounding!

Unfortunately I accidentally destroyed one of the soldering points on the board, so I had to attach one leg of the cap to a component just beside it. Also got too close to one of the pots (Hat grain) with the soldering iron, melting it a bit... and I had read some warnings from someone online who did the same thing. Oh well. It wasn't that bad after all.
My main goal was to have a switch for the capacitor to be able to select the original sound, and also to add a MIDI Out port, but as ELFA didn't have these components at the shop I just bought the caps.
Will do the MIDI Out mod some other time.
Cheers!
A quick stop at ELFA to pick up some 100nF Ceramic Capacitors and a bit of soldering did the job, and the snare got much better sounding!

Unfortunately I accidentally destroyed one of the soldering points on the board, so I had to attach one leg of the cap to a component just beside it. Also got too close to one of the pots (Hat grain) with the soldering iron, melting it a bit... and I had read some warnings from someone online who did the same thing. Oh well. It wasn't that bad after all.
My main goal was to have a switch for the capacitor to be able to select the original sound, and also to add a MIDI Out port, but as ELFA didn't have these components at the shop I just bought the caps.
Will do the MIDI Out mod some other time.
Cheers!
Wednesday, March 1, 2017
Reason Tips & Tricks - Stereo / Mono input switch
In an earlier post I made an External / Internal source input switch to go in the default Reason template. This is an alteration to that patch, which adds a Stereo / Mono input switch, useful when sampling a mono instrument and removes the need to fiddle with the cables in the back of the rack.
You can download the "mrfprod_Default.reason" file here or follow the instructions below.
My default patch uses the A/B Audio & CV Switch and the ReMark Rack Divider, both which can be downloaded for free from Propellerhead Shop.
The instructions below assumes that you've first made the External/Internal switch.
The Sampling Input Source & Stereo/Mono Switcher Patch:
You can download the "mrfprod_Default.reason" file here or follow the instructions below.
My default patch uses the A/B Audio & CV Switch and the ReMark Rack Divider, both which can be downloaded for free from Propellerhead Shop.
The instructions below assumes that you've first made the External/Internal switch.
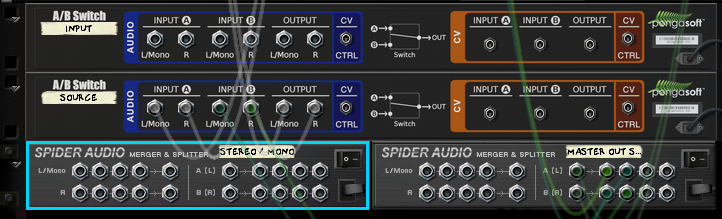 |
| 1. Switch to the back and create a new A/B Switch named "Input" and a new Spider Audio unit, named "Stereo / Mono". |
 |
| 2. Move L & R cables from the Source switch outputs to the Input switch outputs. |
 |
| 3. Connect Source switch outputs to the stereo/mono spider split inputs. |
 |
| 4. Connect the first L&R split outputs to Input Switch input A L&R. |
 |
| 5. Connect the next two splitter L&R outputs to the merge sections first two Left inputs. |
 |
| 6. And finally, connect the Stereo/Mono spider's Left merge output to Left Input B on the Input switch. |
 |
| The final result! |
There you have it! Switch easily between a stereo or mono signal, from an internal or external sound source!
If you found this useful, please leave a comment! :)
Thursday, February 23, 2017
Play!
The Moog Sub Phatty is a lovely little synth, and it amazes me every time I use it! I got one last september but I didn't do any (complete) music with it until now! Better late than... more late. :)

Enjoy!

The song is called "Play!", and was made with the Phatty only, except for drums.
Enjoy!
Tuesday, February 7, 2017
DYI Project: Sound absorption panels
After wanting sound absorption panels for a long time (years!), I finally got the opportunity to build a couple to place on the wall behind my studio monitors. So, here's my recipe for 8 absorption panels, with a total size of 615 * 1195 * 70 mm each. I do apologize for the blurry and dark pictures... still getting to know my new camera! ;)
I choose to build the panels using flax(linseed) insulation panels instead of fiberglass or rockwool, as the latter are not that environmental friendly, safe to handle or healthy to have in a living room.
For the flax insulation panels, I found these absorption coefficient values, stated by the manufacturer (not verified):
What you need for the job:
I measured the insulation panels and they were actually 1140 mm tall and not 1170 mm as specified! The width was correct though.
To get a good fit inside the frame, I subtracted 10 mm in both X and Y dimensions.
I cut the boards in 45 degree angles, so the tall sides were 1186 mm on the 'outside' (1130 mm 'inside') and the short sides were cut in 616 mm on the 'outside' (560 mm 'inside').

I pre-drilled holes for the screws, to minimize risk of wood cracking, put some wood glue in between and put 1 screw in the middle from one side, and 2 from the other side. This way the frame gets really sturdy.

The final result! Looks pretty good, and a lot of room reflections are gone. Next mission is to find a fitting carpet to place on the floor to get rid of a bit vertical reflections. Much more could be done to the room, but remember... this is still our living room! :D
A big thanks to my friend Tobias for driving to and from the hardware store, and building the first panel!
Kisses to my pregnant girlfriend for putting up with my audiophilia!
I hope you found this post useful!
For the flax insulation panels, I found these absorption coefficient values, stated by the manufacturer (not verified):
| 125Hz | 250Hz | 500Hz | 1000Hz | 2000Hz | 4000Hz | |
| 50mm | 0,2 | 0,45 | 0,70 | 0,80 | 0,90 | 0,95 |
| 100mm | 0,65 | 0,75 | 0,75 | 0,85 | 0,90 | 0,95 |
| 150mm | 0,80 | 0,90 | 0,90 | 0,90 | 0,90 | 1,0 |
What you need for the job:
- 8 insulation panels
- Flax panels, 70 * 565 * 1170 mm.
- 7-8 pieces of wooden boards 28 * 70 * 4200
- Depending on available board length at the warehouse, do the math about length and best cutting measurements. (I bought 8 of these boards)
- a Mitre saw
- Screws 4,0 * 50 mm
- Staple gun and 6 mm staples
- Bigger staples for hanger wire mounting
- Hanger wire
- Some nice pieces of cloth
- Electric drill
- Electric screw driver
 |
| The must-have tools, besides electric drill and screwdriver. |
I measured the insulation panels and they were actually 1140 mm tall and not 1170 mm as specified! The width was correct though.
To get a good fit inside the frame, I subtracted 10 mm in both X and Y dimensions.
I cut the boards in 45 degree angles, so the tall sides were 1186 mm on the 'outside' (1130 mm 'inside') and the short sides were cut in 616 mm on the 'outside' (560 mm 'inside').

 |
| Not cutting audio this time. |
I pre-drilled holes for the screws, to minimize risk of wood cracking, put some wood glue in between and put 1 screw in the middle from one side, and 2 from the other side. This way the frame gets really sturdy.
 |
| Use a previously built frame to support building of others. |
 |
| Three screws per corner. Start with the single screw, but do not tighten it until the other two screws are in place. This to prevent misalignment. |
 |
| Some pieces of wood looked like this, or worse. Face those pieces to the inside of the frame. |
 |
| The panel fitting nicely into the frame! |
 |
| Did some weight reduction on one of the frames. |
 |
| Depending on the cloth pattern I used different methods to cover the back side. The one in the picture above was clearly the best option ('the double wrap'). The other method was to cut out a single sheet as big as the back side, and staple it in place before putting in the insulation piece in and mounting the main cloth. |
 |
| Cutting the cloth this way made it simpler to get a nice fold in the corners. Begin win the backside corner, making a 45º fold pretty much aligned with the wood cuts. Then stretch the cloth from the middle of the short side outwards, and then finally stretching the cloth from the front side corner to get a tight fit with no slop. |
 |
| A neat and tight corner. |
 |
| I placed the hanger staples at 23 cm from the top. |
 |
| Stretch the wire between the staples, pinch it in place with the hammer, and tie a small knot at each end. |
 |
| The wire will flex a certain amount, giving 16 cm to the top when supporting it's own weight, making it an easy task to place the wall hook and get all panels at the same height. |

The final result! Looks pretty good, and a lot of room reflections are gone. Next mission is to find a fitting carpet to place on the floor to get rid of a bit vertical reflections. Much more could be done to the room, but remember... this is still our living room! :D
A big thanks to my friend Tobias for driving to and from the hardware store, and building the first panel!
Kisses to my pregnant girlfriend for putting up with my audiophilia!
I hope you found this post useful!
Sunday, August 28, 2016
Pitch Black - Part 1 & 2
I'ts time for another mrfprod release! A two-part tune called Pitch Black.
Enjoy!
Enjoy!
Monday, May 30, 2016
Live on stage: We Could Build An Empire
Last Saturday I got to do the live mixing for a gig by "We Could Build An Empire", at RoQ in Stockholm city.
The band played 9 songs total, and the gig lasted about an hour.
A live mix is just as live as the band playing, and when I do live mixing I'm continuously micro tweaking volumes and EQ to make everything sound as good and balanced as possible in the moment. All sound should be pleasant for the ears even at loud volumes, and at best you shouldn't have to wear ear plugs. Unfortunately there are few live mixing technicians that seems to share my opinion, or even care how it really sounds.
You can visit the band's web page at http://www.wcbae.com.
The band played 9 songs total, and the gig lasted about an hour.
A live mix is just as live as the band playing, and when I do live mixing I'm continuously micro tweaking volumes and EQ to make everything sound as good and balanced as possible in the moment. All sound should be pleasant for the ears even at loud volumes, and at best you shouldn't have to wear ear plugs. Unfortunately there are few live mixing technicians that seems to share my opinion, or even care how it really sounds.
You can visit the band's web page at http://www.wcbae.com.
 |
| Tweaking from start to end |
Sunday, November 29, 2015
Reason Tips & Tricks - Sampling Input Switch
I just came up with this simple but yet useful(?) patch in my default rack, and it allows you to quickly switch sampling input between your sound card's inputs and Reason's Output. This can be useful when sampling a Reason made sound into another sample based Reason instrument for further tweaking.
My sound card (Focusrite USB6) only has 2 audio input, so you can probably make some alteration to this patch if your sound card has more than 2 inputs.
This patch uses the A/B Audio and CV Switch rack extension which can be downloaded for free from the Propellerhead Shop.
The Sampling Input Switcher Patch:
Now you can switch between sampling inputs, quick and easy without having to make any manual patching. Save this patch preferably to your Default.reason file.
I hope you found this useful! :)
My sound card (Focusrite USB6) only has 2 audio input, so you can probably make some alteration to this patch if your sound card has more than 2 inputs.
This patch uses the A/B Audio and CV Switch rack extension which can be downloaded for free from the Propellerhead Shop.
The Sampling Input Switcher Patch:
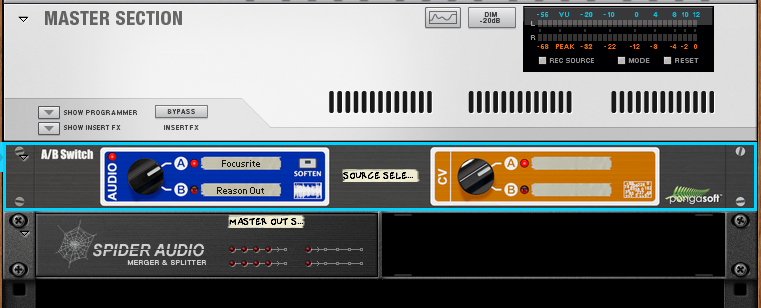 |
| Step 1 |
 |
| Step 2 |
 |
| Step 3 & 4 |
 |
| Step 5 & 6 |
- Below the Master Section, create an A/B Audio & CV Switch and a Spider Audio Merger & Splitter, and give them some useful names.
- Switch to the back and disconnect the default Master Output and Sampling input wiring.
- Connect Audio I/O port 1-2 to A/B Switch Input A L&R.
- Connect Audio I/O Sampling Input L&R to A/B Switch Output L&R.
- Connect Master Section Master Out L&R to Spider Splitter inputs L&R.
- Connect any of the Spider's outputs to A/B Switch input B L&R, and also to Audio I/O Audio Output port 1-2.
I hope you found this useful! :)
Saturday, November 28, 2015
Repeat
Once in a while I make a new song. This one was just finished! This one is not fighting the loudness war, but if you have a capable sound system you can play this one very loud! :D (tried and tested @ Studio Blue, Stockholm/Sweden)
Enjoy! :)
Enjoy! :)
Thursday, November 19, 2015
Keep your Reason project organized
I've been a Propellerhead Reason user for many years and I really enjoy making music with it, but it can get a bit messy and it's easy to get lost in the rack. Therefore I would like to share my way of keeping the mixer, rack and sequencer clean and organized! :)
Standard Template:
I made a custom template for all new projects. It consists of my standard setup of master send effects and also pre-made columns per instrument type:
Send Effects:
1. The Echo
2. RV7000 1
3. RV7000 2
4. RV-7 1
5. RV-7 2
Rack Columns (L to R):
Drums
Bass
Synth
Acoustic
Vocals
I use the free Rack Extension plugin "Remark" for naming the columns, and for naming and marking other stuff inside the rack. I never put any instruments below the send effects in the "Master Section column" as it's "reserved" for effects only.
Channel & Sequencer Order:
I place the SSL mixer channels and Sequencer tracks in the same basic order as the Rack Columns. Drums and percussions goes to the far left, followed by bass, synths, acoustic instruments and vocals.
Color Coding:
I use my own standardized way to color code instruments and automations as this makes it easier for me to quickly find the instrument I'm looking for, especially in the sequencer. I also use the same colors when I use other DAW's such as Reaper.
My choice of colors are (by the names given in Reason):
Red - for drums and percussions.
Steel Blue - for bass sounds.
Moss Green - for synths
Kelly Green - for acoustic instruments like piano, strings etc.
Orange - for electric guitars.
Lilac - for vocals or choirs.
Wheat - for all automations
By coloring all automations in the same color makes them stand out from the midi and audio clips so they can easily be spotted or ignored depending on what you are searching for in the sequencer.
In Reason 8 be also sure to check "Auto-color Tracks and Channels" under Options menu to keep channel strip and sequencer track colors the same!
Naming:
Keep the names of the channels short and informational. If I make a bus in the SSL I will always give it a name in UPPERCASE.
I also name all automation clips, so I quickly can see what parameter it's changing.
Sometimes I also name midi and audio clips but not all the time.
Blocks:
Blocks can be useful sometimes, but when making complex automations or transitions between blocks it's often better to not put the clips into blocks. Another way of using blocks is to use them as markers for different pars of your song.
Combinators:
Every instrument, I put inside a combinator. It's rather seldom I do not hook an instrument up to another unit, such as a mixer or arpeggiator, and keeping everything inside a combinator makes everything a
bit cleaner in the rack, and also gives the possibility to save the instrument as a combinator patch.
I also use the Combinators rotaries and buttons for automation, and have the combinator as a sequencer track. Though, I hope Propellerhead will release a bigger combinator with several more knobs and buttons as just four of each is not enough when making a bit more advanced patches.
Dual screens:
If you are not using dual screens yet, think again. ;) I always put the SSL and Rack on the left screen, and have the sequencer window on the right.
This is the basic standard of how I set up things when using Reason, but of course it depends a bit on the project itself. I hope this will be helpful in your future projects! :)
Standard Template:
I made a custom template for all new projects. It consists of my standard setup of master send effects and also pre-made columns per instrument type:
 |
| Standard Send Effects |
Send Effects:
1. The Echo
2. RV7000 1
3. RV7000 2
4. RV-7 1
5. RV-7 2
 |
| Standard Rack Columns |
Drums
Bass
Synth
Acoustic
Vocals
I use the free Rack Extension plugin "Remark" for naming the columns, and for naming and marking other stuff inside the rack. I never put any instruments below the send effects in the "Master Section column" as it's "reserved" for effects only.
Channel & Sequencer Order:
I place the SSL mixer channels and Sequencer tracks in the same basic order as the Rack Columns. Drums and percussions goes to the far left, followed by bass, synths, acoustic instruments and vocals.
Color Coding:
I use my own standardized way to color code instruments and automations as this makes it easier for me to quickly find the instrument I'm looking for, especially in the sequencer. I also use the same colors when I use other DAW's such as Reaper.
My choice of colors are (by the names given in Reason):
Red - for drums and percussions.
Steel Blue - for bass sounds.
Moss Green - for synths
Kelly Green - for acoustic instruments like piano, strings etc.
Orange - for electric guitars.
Lilac - for vocals or choirs.
Wheat - for all automations
By coloring all automations in the same color makes them stand out from the midi and audio clips so they can easily be spotted or ignored depending on what you are searching for in the sequencer.
In Reason 8 be also sure to check "Auto-color Tracks and Channels" under Options menu to keep channel strip and sequencer track colors the same!
 |
| BUS naming |
Keep the names of the channels short and informational. If I make a bus in the SSL I will always give it a name in UPPERCASE.
 |
| Naming Automation Clips |
Sometimes I also name midi and audio clips but not all the time.
Blocks:
 |
| Blocks as markers |
Combinators:
 |
| Combinators for everything |
bit cleaner in the rack, and also gives the possibility to save the instrument as a combinator patch.
I also use the Combinators rotaries and buttons for automation, and have the combinator as a sequencer track. Though, I hope Propellerhead will release a bigger combinator with several more knobs and buttons as just four of each is not enough when making a bit more advanced patches.
Dual screens:
If you are not using dual screens yet, think again. ;) I always put the SSL and Rack on the left screen, and have the sequencer window on the right.
This is the basic standard of how I set up things when using Reason, but of course it depends a bit on the project itself. I hope this will be helpful in your future projects! :)
Thursday, November 5, 2015
Friday, October 9, 2015
Vad är det som låter? Del 2. (What's that sound, part 2)
If you know Swedish, then you should listen to this program about Loudness War! If you're not familiar with the term "loudness war", it's the process of getting music to be as loud as possible to draw attention and to stand out from the rest. The downside of this is that the music then gets less dynamics and also lots of added distortion, which in turn prevent you from playing the material really loud (the ears won't like it) and it also triggers listener fatigue quicker.
People are becoming more and more aware about this, and this is one reason that vinyl is getting more and more popular. The audio on CDs can be pushed harder technically than vinyl and therefore they often sound worse than it's counterpart. The problem is not the CD, it's the processing done to the music!
Listen to the program here:
http://sverigesradio.se/sida/avsnitt/613255?programid=4112

People are becoming more and more aware about this, and this is one reason that vinyl is getting more and more popular. The audio on CDs can be pushed harder technically than vinyl and therefore they often sound worse than it's counterpart. The problem is not the CD, it's the processing done to the music!
Listen to the program here:
http://sverigesradio.se/sida/avsnitt/613255?programid=4112

Tuesday, September 29, 2015
Urbanears Medis
Recently I bought a new headset to my phone, as my old pair of A-Jays One+ broke, making one earpiece play at a lower level than the other one. I finally choose the Urbanears Medis, as they weren't the usual ear plug, that always falls out of my left ear. I have been using them for a while now, and in the beginning I wasn't sure that they were any good but after a while I discovered that they were advantageous compared to the One+.
The sound... Maybe not that great, as they are not the usual in-ear plugs the speakers sit at some (tiny) distance from the ear canal making the bass thinner, but as my main goal was portability I'm pretty much happy if I just can hear the music at all, but overall they don't sound bad. :)
The earpieces use the "EarClick" solution which makes them lock into my ears, and doesn't fall out while moving, which is really great.
Another thing I noticed is that they are not suffering from the horrible cable-noise that all my previous head phones have had, leading up noise through the cable when its moving and touching my body! Now I can have the cable wherever I want (phone in a pocket somewhere) and walk around with just the music in my ears, and not hear the noise every time the cable slams against my clothes.
As they are not plugged into the ear canal, they also let in the sound from the surrounding which I think is good due to security. You should always be aware of your surroundings!
Pros
Cons
To sum up, for me these headphones are really great! :)


The sound... Maybe not that great, as they are not the usual in-ear plugs the speakers sit at some (tiny) distance from the ear canal making the bass thinner, but as my main goal was portability I'm pretty much happy if I just can hear the music at all, but overall they don't sound bad. :)
The earpieces use the "EarClick" solution which makes them lock into my ears, and doesn't fall out while moving, which is really great.
Another thing I noticed is that they are not suffering from the horrible cable-noise that all my previous head phones have had, leading up noise through the cable when its moving and touching my body! Now I can have the cable wherever I want (phone in a pocket somewhere) and walk around with just the music in my ears, and not hear the noise every time the cable slams against my clothes.
As they are not plugged into the ear canal, they also let in the sound from the surrounding which I think is good due to security. You should always be aware of your surroundings!
Pros
- Pretty cheap (399SEK)
- Very portable
- No cable noise
- EarClick solution works
- Surrounding awareness
Cons
- Sound is a bit thin, but works for me


Wednesday, September 9, 2015
UMK 2016
Last weekend I went to Finland to write and record a new song together with Rasmus and Jeanette. The goal was to enter UMK 2016, the starting point into the Eurovision Song Contest!
Rasmus is my good friend from Studio Blue, and Jeanette was the one who contacted Rasmus and started the song writing project. Rasmus then wanted me to be a part of the project, and I was of course delighted!
We worked really hard and we spent about 50 hours of writing, composing and recording during the 4 days I was there. The deadline was 2015-09-08 at 12:00, but we managed to get the song demo package ready the day before that and got it delivered in time before I went to the airport and back to Sweden!
The song we wrote is called Never Alone, and if we don't make it as far as to the ESC we will continue working on it and probably release it later. Unfortunately we cannot share any sounds yet due to the competition rules.


Rasmus is my good friend from Studio Blue, and Jeanette was the one who contacted Rasmus and started the song writing project. Rasmus then wanted me to be a part of the project, and I was of course delighted!
We worked really hard and we spent about 50 hours of writing, composing and recording during the 4 days I was there. The deadline was 2015-09-08 at 12:00, but we managed to get the song demo package ready the day before that and got it delivered in time before I went to the airport and back to Sweden!
The song we wrote is called Never Alone, and if we don't make it as far as to the ESC we will continue working on it and probably release it later. Unfortunately we cannot share any sounds yet due to the competition rules.

 |
| Were the magic happened |

 |
| Two tired guys |
 |
| The Dream Team - Rasmus, Jeanette and I |
 |
| The point of no return - Demo package delivered! |
Monday, August 24, 2015
The Wedding
One of my closest friends got married last Saturday, and I got the honor to be responsible for the audio for speeches and the live acts. There were a total of five different bands playing during the night, and even I got to be on stage playing electric guitar! The last time I was on the same stage was in 1990 when I graduated from 9th grade! :)
It was a beautiful wedding and a great party, and the audio was of course awesome! ;)

It was a beautiful wedding and a great party, and the audio was of course awesome! ;)

Wednesday, July 22, 2015
I Wish I Was A Fish - "Emma"
Just released; the music video for I Wish I Was A Fish's "Emma"! Most parts of it was recorded at Studio Blue, and I got to be the assisting sound technician to Carin Hallin, who was the producer.
I can be spotted in this video at the beginning, and also when recording the hand claps!
Press play on tape below! :)
oh, almost forgot... Today is my 40th birthday! :)
I can be spotted in this video at the beginning, and also when recording the hand claps!
Press play on tape below! :)
oh, almost forgot... Today is my 40th birthday! :)
Tuesday, July 21, 2015
My music in Studio Blue's commercial clip!
It's all in Swedish though.
Ljudtekniker/Producentlinjen på Studio Blue. Kursstart 7 september. Ansök nu!
Posted by Studio Blue on den 21 juli 2015
The full version of Satisfied:
Thursday, June 18, 2015
Rapid Environment for Audio Production, Engineering and Recording a.k.a REAPER
At school (Studio Blue) we used Protools 10 & 11 for all our productions and tasks, but after two years of using it I still didn't like it that much and I didn't feel that it was worth buying for hundreds of dollars. It wasn't very stable and crashed several times(yep, on a Mac), as compared to Reason, my main DAW, which I don't think has crashed at all... ever (PC/Mac). Almost every time I used Protools there was always something that I was annoyed with that caused a bit of frustration.
As Reason has very limited features for audio editing, vertical zoom limitation being the most annoying thing (still not fixed in Reason 8), I started using Reaper as a complement. Reaper is fully functional even in demo mode so you can try it for as long as you like, although you should register after 60 days or so. The pricing is very attractive, just $60 for discounted license (non-commercial/Small Business) and $225 for full commercial license.
As I'm using Reaper more and more, the more I like it which was not the case with Protools. Reaper is very customizable, and basically it's like; if you want to change something, you can! Besides from native plugins found in Protools, as for today I do not know about anything I could do in Protools that I cannot do in Reaper... and Reaper actually make a lot of things better and easier than PT!
There are however a couple of things that I like to change to the default setup of Reaper, and I will share those settings here!
Preferences (Options->Preferences)
1. Audio -> Rendering => Tail length when rendering project or stems, or freezing tracks

This option is set to 2000 ms as default I think, and caused me a bit of a headache before I found it. I did some drums samples editing and when I rendered multiple hits to disk, some of the clips had more than I hit in them, but all my clip-edits were just containing one hit! This option added a tail to the clip which in certain cases also kept the next hit in the series. To keep your clips as long as you specify when making clips, set this option to 0 ms.
2. General -> Paths => Store all peak caches (.reapeaks) in alternate path

Repeaks are files that contain the actual waveform image you see on the screen, and by default these cache files are stored in your default project folder. There will be many .repeaks files, that are of no use outside of Reaper, so I keep them in a separate folder so I don't have to see them.
3. General => Create undo points for item/track selection

I unchecked this as I want the undo function to undo actual changes, instead of just selections.
Project Settings (File -> Project Settings)
Media tab => Path to save media files (can be relative, leave blank for same path as project file)

By default all recorded files are saved in the same folder as your project file. In Protools all audio files are saved in a folder called "Audio Files" which is a better and cleaner option. Just type in a folder name, i use Audio Files, and your project folder will be more organized.
Options menu => Trim content behind media items when editing
One thing I got used to in Protools was when pasting a clip over another clip, the 'background clip' was automatically trimmed, and there was only one layer of clips. By default in Reaper, when you paste a clip onto another there are two layers, and the background clip remains intact. To change this, just select the option "Trim content behind media items when editing" from the Options menu. To make this selection permanent in all new projects, go to File -> Project Settings and click "Save as default project settings".
Besides from the above settings I also made my own shortcuts, which now is a combination of Reason and Protools shortcuts. You can change any shortcut to your liking, and even import / export them.
I'm also using the RADO V4 theme which I think looks great!
Don't forget to install the SWS Extension which adds more great features to Reaper, like a loudness analyzer...

...and the great Snapshot function where you can compare different mixer settings.

I hope you found this helpful! :)
As Reason has very limited features for audio editing, vertical zoom limitation being the most annoying thing (still not fixed in Reason 8), I started using Reaper as a complement. Reaper is fully functional even in demo mode so you can try it for as long as you like, although you should register after 60 days or so. The pricing is very attractive, just $60 for discounted license (non-commercial/Small Business) and $225 for full commercial license.
As I'm using Reaper more and more, the more I like it which was not the case with Protools. Reaper is very customizable, and basically it's like; if you want to change something, you can! Besides from native plugins found in Protools, as for today I do not know about anything I could do in Protools that I cannot do in Reaper... and Reaper actually make a lot of things better and easier than PT!
There are however a couple of things that I like to change to the default setup of Reaper, and I will share those settings here!
Preferences (Options->Preferences)
1. Audio -> Rendering => Tail length when rendering project or stems, or freezing tracks

This option is set to 2000 ms as default I think, and caused me a bit of a headache before I found it. I did some drums samples editing and when I rendered multiple hits to disk, some of the clips had more than I hit in them, but all my clip-edits were just containing one hit! This option added a tail to the clip which in certain cases also kept the next hit in the series. To keep your clips as long as you specify when making clips, set this option to 0 ms.
2. General -> Paths => Store all peak caches (.reapeaks) in alternate path

Repeaks are files that contain the actual waveform image you see on the screen, and by default these cache files are stored in your default project folder. There will be many .repeaks files, that are of no use outside of Reaper, so I keep them in a separate folder so I don't have to see them.
3. General => Create undo points for item/track selection

I unchecked this as I want the undo function to undo actual changes, instead of just selections.
Project Settings (File -> Project Settings)
Media tab => Path to save media files (can be relative, leave blank for same path as project file)

By default all recorded files are saved in the same folder as your project file. In Protools all audio files are saved in a folder called "Audio Files" which is a better and cleaner option. Just type in a folder name, i use Audio Files, and your project folder will be more organized.
Options menu => Trim content behind media items when editing
One thing I got used to in Protools was when pasting a clip over another clip, the 'background clip' was automatically trimmed, and there was only one layer of clips. By default in Reaper, when you paste a clip onto another there are two layers, and the background clip remains intact. To change this, just select the option "Trim content behind media items when editing" from the Options menu. To make this selection permanent in all new projects, go to File -> Project Settings and click "Save as default project settings".
Besides from the above settings I also made my own shortcuts, which now is a combination of Reason and Protools shortcuts. You can change any shortcut to your liking, and even import / export them.
I'm also using the RADO V4 theme which I think looks great!
Don't forget to install the SWS Extension which adds more great features to Reaper, like a loudness analyzer...

...and the great Snapshot function where you can compare different mixer settings.

I hope you found this helpful! :)
Subscribe to:
Posts (Atom)