I'ts time for another mrfprod release! A two-part tune called Pitch Black.
Enjoy!
MRF PRODUCTIONS - 2018
Sunday, August 28, 2016
Monday, May 30, 2016
Live on stage: We Could Build An Empire
Last Saturday I got to do the live mixing for a gig by "We Could Build An Empire", at RoQ in Stockholm city.
The band played 9 songs total, and the gig lasted about an hour.
A live mix is just as live as the band playing, and when I do live mixing I'm continuously micro tweaking volumes and EQ to make everything sound as good and balanced as possible in the moment. All sound should be pleasant for the ears even at loud volumes, and at best you shouldn't have to wear ear plugs. Unfortunately there are few live mixing technicians that seems to share my opinion, or even care how it really sounds.
You can visit the band's web page at http://www.wcbae.com.
 |
| Tweaking from start to end |
Sunday, November 29, 2015
Reason Tips & Tricks - Sampling Input Switch
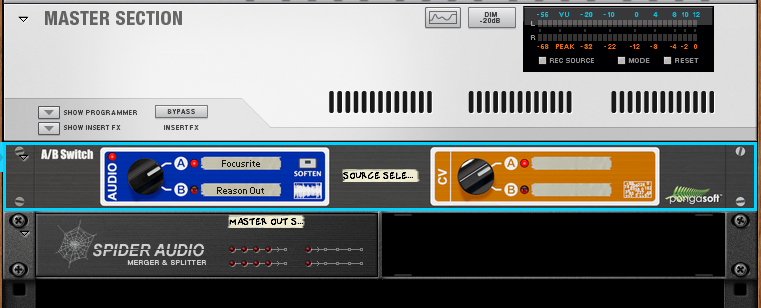
I just came up with this simple but yet useful(?) patch in my default rack, and it allows you to quickly switch sampling input between your sound card's inputs and Reason's Output. This can be useful when sampling a Reason made sound into another sample based Reason instrument for further tweaking.
My sound card (Focusrite USB6) only has 2 audio input, so you can probably make some alteration to this patch if your sound card has more than 2 inputs.
This patch uses the A/B Audio and CV Switch rack extension which can be downloaded for free from the Propellerhead Shop.
The Sampling Input Switcher Patch:
Now you can switch between sampling inputs, quick and easy without having to make any manual patching. Save this patch preferably to your Default.reason file.
I hope you found this useful! :)
My sound card (Focusrite USB6) only has 2 audio input, so you can probably make some alteration to this patch if your sound card has more than 2 inputs.
This patch uses the A/B Audio and CV Switch rack extension which can be downloaded for free from the Propellerhead Shop.
The Sampling Input Switcher Patch:
 |
| Step 1 |
 |
| Step 2 |
 |
| Step 3 & 4 |
 |
| Step 5 & 6 |
- Below the Master Section, create an A/B Audio & CV Switch and a Spider Audio Merger & Splitter, and give them some useful names.
- Switch to the back and disconnect the default Master Output and Sampling input wiring.
- Connect Audio I/O port 1-2 to A/B Switch Input A L&R.
- Connect Audio I/O Sampling Input L&R to A/B Switch Output L&R.
- Connect Master Section Master Out L&R to Spider Splitter inputs L&R.
- Connect any of the Spider's outputs to A/B Switch input B L&R, and also to Audio I/O Audio Output port 1-2.
I hope you found this useful! :)
Saturday, November 28, 2015
Repeat
Once in a while I make a new song. This one was just finished! This one is not fighting the loudness war, but if you have a capable sound system you can play this one very loud! :D (tried and tested @ Studio Blue, Stockholm/Sweden)
Enjoy! :)
Enjoy! :)
Thursday, November 19, 2015
Keep your Reason project organized
I've been a Propellerhead Reason user for many years and I really enjoy making music with it, but it can get a bit messy and it's easy to get lost in the rack. Therefore I would like to share my way of keeping the mixer, rack and sequencer clean and organized! :)
Standard Template:
I made a custom template for all new projects. It consists of my standard setup of master send effects and also pre-made columns per instrument type:
Send Effects:
1. The Echo
2. RV7000 1
3. RV7000 2
4. RV-7 1
5. RV-7 2
Rack Columns (L to R):
Drums
Bass
Synth
Acoustic
Vocals
I use the free Rack Extension plugin "Remark" for naming the columns, and for naming and marking other stuff inside the rack. I never put any instruments below the send effects in the "Master Section column" as it's "reserved" for effects only.
Channel & Sequencer Order:
I place the SSL mixer channels and Sequencer tracks in the same basic order as the Rack Columns. Drums and percussions goes to the far left, followed by bass, synths, acoustic instruments and vocals.
Color Coding:
I use my own standardized way to color code instruments and automations as this makes it easier for me to quickly find the instrument I'm looking for, especially in the sequencer. I also use the same colors when I use other DAW's such as Reaper.
My choice of colors are (by the names given in Reason):
Red - for drums and percussions.
Steel Blue - for bass sounds.
Moss Green - for synths
Kelly Green - for acoustic instruments like piano, strings etc.
Orange - for electric guitars.
Lilac - for vocals or choirs.
Wheat - for all automations
By coloring all automations in the same color makes them stand out from the midi and audio clips so they can easily be spotted or ignored depending on what you are searching for in the sequencer.
In Reason 8 be also sure to check "Auto-color Tracks and Channels" under Options menu to keep channel strip and sequencer track colors the same!
Naming:
Keep the names of the channels short and informational. If I make a bus in the SSL I will always give it a name in UPPERCASE.
I also name all automation clips, so I quickly can see what parameter it's changing.
Sometimes I also name midi and audio clips but not all the time.
Blocks:
Blocks can be useful sometimes, but when making complex automations or transitions between blocks it's often better to not put the clips into blocks. Another way of using blocks is to use them as markers for different pars of your song.
Combinators:
Every instrument, I put inside a combinator. It's rather seldom I do not hook an instrument up to another unit, such as a mixer or arpeggiator, and keeping everything inside a combinator makes everything a
bit cleaner in the rack, and also gives the possibility to save the instrument as a combinator patch.
I also use the Combinators rotaries and buttons for automation, and have the combinator as a sequencer track. Though, I hope Propellerhead will release a bigger combinator with several more knobs and buttons as just four of each is not enough when making a bit more advanced patches.
Dual screens:
If you are not using dual screens yet, think again. ;) I always put the SSL and Rack on the left screen, and have the sequencer window on the right.
This is the basic standard of how I set up things when using Reason, but of course it depends a bit on the project itself. I hope this will be helpful in your future projects! :)
Standard Template:
I made a custom template for all new projects. It consists of my standard setup of master send effects and also pre-made columns per instrument type:
 |
| Standard Send Effects |
Send Effects:
1. The Echo
2. RV7000 1
3. RV7000 2
4. RV-7 1
5. RV-7 2
 |
| Standard Rack Columns |
Drums
Bass
Synth
Acoustic
Vocals
I use the free Rack Extension plugin "Remark" for naming the columns, and for naming and marking other stuff inside the rack. I never put any instruments below the send effects in the "Master Section column" as it's "reserved" for effects only.
Channel & Sequencer Order:
I place the SSL mixer channels and Sequencer tracks in the same basic order as the Rack Columns. Drums and percussions goes to the far left, followed by bass, synths, acoustic instruments and vocals.
Color Coding:
I use my own standardized way to color code instruments and automations as this makes it easier for me to quickly find the instrument I'm looking for, especially in the sequencer. I also use the same colors when I use other DAW's such as Reaper.
My choice of colors are (by the names given in Reason):
Red - for drums and percussions.
Steel Blue - for bass sounds.
Moss Green - for synths
Kelly Green - for acoustic instruments like piano, strings etc.
Orange - for electric guitars.
Lilac - for vocals or choirs.
Wheat - for all automations
By coloring all automations in the same color makes them stand out from the midi and audio clips so they can easily be spotted or ignored depending on what you are searching for in the sequencer.
In Reason 8 be also sure to check "Auto-color Tracks and Channels" under Options menu to keep channel strip and sequencer track colors the same!
 |
| BUS naming |
Keep the names of the channels short and informational. If I make a bus in the SSL I will always give it a name in UPPERCASE.
 |
| Naming Automation Clips |
Sometimes I also name midi and audio clips but not all the time.
Blocks:
 |
| Blocks as markers |
Combinators:
 |
| Combinators for everything |
bit cleaner in the rack, and also gives the possibility to save the instrument as a combinator patch.
I also use the Combinators rotaries and buttons for automation, and have the combinator as a sequencer track. Though, I hope Propellerhead will release a bigger combinator with several more knobs and buttons as just four of each is not enough when making a bit more advanced patches.
Dual screens:
If you are not using dual screens yet, think again. ;) I always put the SSL and Rack on the left screen, and have the sequencer window on the right.
This is the basic standard of how I set up things when using Reason, but of course it depends a bit on the project itself. I hope this will be helpful in your future projects! :)
Thursday, November 5, 2015
Friday, October 9, 2015
Vad är det som låter? Del 2. (What's that sound, part 2)
If you know Swedish, then you should listen to this program about Loudness War! If you're not familiar with the term "loudness war", it's the process of getting music to be as loud as possible to draw attention and to stand out from the rest. The downside of this is that the music then gets less dynamics and also lots of added distortion, which in turn prevent you from playing the material really loud (the ears won't like it) and it also triggers listener fatigue quicker.
People are becoming more and more aware about this, and this is one reason that vinyl is getting more and more popular. The audio on CDs can be pushed harder technically than vinyl and therefore they often sound worse than it's counterpart. The problem is not the CD, it's the processing done to the music!
Listen to the program here:
http://sverigesradio.se/sida/avsnitt/613255?programid=4112

Subscribe to:
Posts (Atom)